Kid-Made Nativity Platter

If you’re a grandma or godmother to my hooligans, stop reading right now, or risk a spoiler for your Christmas gift!

For the rest of you, take a peek at these fabulous platters my precious angels made. (And, no, they’re generally not angels in any way).

Platter-ChaosServedDaily

I found these great square dinner plates at Target..on sale, no less!  I don’t like them as plates, but they’re perfect as cookie platters for Christmas gifts. These didn’t take long at all to make, and, while they aren’t perfect, I think they’re charmingly handmade…and pretty impressive for 6-,8-, and 10-year-olds.

All you’ll need is a platter, a gold paint pen for glass, and the drawing you want to put on the platter.  Oh, and the hardest thing to procure…carbon paper!  I had to look through all of our moving paperwork from like 8 moves ago to find a piece!  Anyway, that’s all you’ll need.

I found a similar line drawing on line and printed it as a goal for the hooligans.  Then I assigned parts of the drawing to each…Princess Thundercloud did the star and rays, and the ground.  My middle kid drew the stable and Jesus in the manger. The eldest drew Mary and Joseph. And all without fighting…can you believe it?

I used the carbon paper to trace the drawing onto each platter, then the eldest went over it with the gold glass paint pen. We let them dry overnight, then baked them according to the directions on the package.  I think we put them in a cold oven and heated it to 375 degrees, then baked them 30 or 45 minutes, then turned the oven off and let them cool in the oven. I washed them a little too soon, to get the carbon off that was peeking out from under the gold paint.  A few spots got a little thin…but it was still pretty!

These are not microwave or dishwasher safe, but can be handwashed with warm soapy water and a soft cloth with no problem. And, really, would you want to use a scratchy pad on the Holy Family, anyway? I thought  not.

This was a fun project for the kids…it didn’t take more than an hour, and they were proud of the results.  Almost-instant gratification is always a plus! We made these for the grandmas and the kids’ godmother (who happens to be their aunt)…and I had them make an extra for us!  I’m so excited to use it this Christmas season!

Signature

Posted in Christmas, crafts, kids | Tagged , , | 2 Comments

Perfectly Simple Snowman Mugs

I’m sure, if you’re on Pinterest, you’ve seen these Snowman Mugs about a hundred times.  Here’s what’s different about these…I did not use Sharpies.  I’ve tried and tried using Sharpies on dishes…following all the tips…let cure overnight, put in a cold oven, heat to 400 degrees and leave them for 40 minutes, then turn off the oven and leave them in there until cool.  Nothing has ever made them truly washing-proof.  And I mean hand-washing.  The dishwasher?  Fuhgeddaboutit.

But I love snowmen/women/people, and really wanted a set of mugs for all of us, instead of the pairs we have. So I bought some dollar mugs and a set of paint pens. They weren’t that expensive, either…less than Sharpies, I think. But they stay on through washing!  I still can’t brave the dishwasher with them, though. Maybe someday.

Mugs-ChaosServedDaily

I made bowties for the boys and hairbows for the girls, and personalized the ones for the hooligans. It’s so nice that they think the Tinkertoy writing I learned as a high school cheerleader is impressively artsy!  I left the other 3 mugs blank as far as personalization.

As you can probably see, I used orange, black, red, and purple paint pens…the fine tipped ones.  I let them dry overnight, then put them in a cold oven and heated it to 350 degrees. After leaving them for 30 minutes, I turned off the oven and let them cool in it. Then I resisted temptation for another day and didn’t immediately try washing them. When I did wash them, 24 hours later, everything stayed right where I painted it.  Wahoo!

I’m going to give these to the kids on Christmas Eve, along with new PJ’s, so we can have hot cocoa, popcorn, and watch “The Polar Express” for the umpteenth time. Wouldn’t these be a fun party favor for a cookie swap, with a few cocoa or coffee packets inside?  Or if you’re having guests for the holidays, they’ll think you’re the bomb when they have a personalized mug at the breakfast table! Just don’t give them to your kids’ teachers…as a child of teachers, I know they have WAAAAY too many coffee mugs already!

Signature

Posted in Christmas, crafts, kids | Tagged , | 4 Comments

Made in Minutes T-Shirt Tote Bag

A couple of weeks ago, a hooligan helpfully left a crayon in a pocket in the laundry…fortunately, the only thing it really ruined was a t-shirt belonging to Princess Thundercloud. I’ve successfully gotten crayon out of clothes before, using dish soap, hot water, and a whole process I found online that took about a day of my life. This t-shirt, adorable though it is, was on the verge of being outgrown anyway, so I planned to just throw it out. And, happily, I found the next size larger on clearance last weekend.

Anyway, this ruined one has been sitting on the dryer for two weeks and I just couldn’t bring myself to throw it in the trash…but I also couldn’t donate it to the thrift shop with those crayon marks on it. So I decided to make a tote bag out of it for Princess Thundercloud’s gymnastics gear…she has very little gear, and what there is, is not substantial! It’s basically flip flops, a dinner bag, and a water bottle. This t-shirt would be a perfect size bag.  I saw this idea on Martha Stewart years ago, and it’s been stuck in a corner of my mind ever since.

Tote-ChaosServedDaily

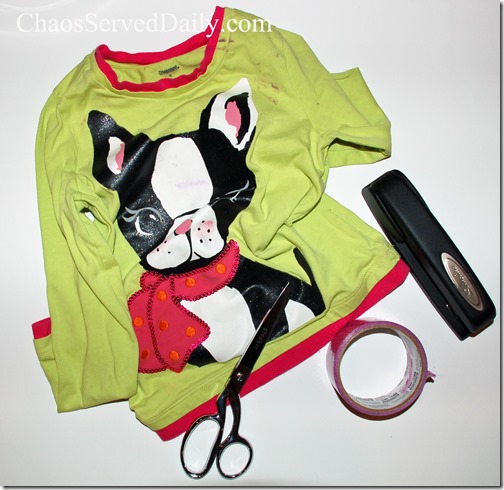
Here’s what I used:

  • a t-shirt
  • stapler
  • scissors for cutting material
  • scissors for cutting duct tape
  • duct tapeTote-Supplies-ChaosServedDa

And there’s no sewing involved!  This actually would have been a good project for Thundercloud to make herself, but I wanted to give it to her as a Christmas gift.

First, cut off the sleeves along the seam, then cut around the neck and as far down as you want or can without interfering with the design.

Tote-Cut-ChaosServedDaily

Next, turn it inside out and staple all across the bottom.  Then turn it over and staple the same thing again, to reinforce it.

Tote-Bottom-ChaosServedDail

Now grab your duct tape and just start covering it. Make one strip across the bottom so that half of its width is on one side and half on the other. Keep covering until you get to where you cut the sleeves out. Yes, the armpit of the shirt.

Tote-Tape-ChaosServedDaily

Staple a triangle on each bottom corner to make a sort of gusset, fold it up along the staples and duct tape over to make it smooth. Tote-Corner-ChaosServedDail

Now just turn the bag right-side-out.  I added a strip of tape around the top of each handle, just to reinforce it a little.  But I forgot to take a photo of that, so see…it’s up there at the top of this photo. I’ve already wrapped her bag, so can’t take another photo now!

Tote-ChaosServedDaily

I think she’ll love it!

Signature

Posted in crafts, gifts, kids | Tagged , , | Leave a comment

Cute Curly-Q Crocheted Hat

For Halloween, Princess Thundercloud was a Lalaloopsy, and I made her a bright turquoise blue wig out of yarn. But, they couldn’t wear any part of their costumes to school this year and instead were encouraged to wear crazy hats and socks.  So, of course, I thought I’d just make a crazy hat for her. Ignore the fact that I have only very basic crocheting skills.

One of my friends found an adorable wig for a Merida (from Brave) costume for her little girl.  It was basically a stocking hat, with long curls made of double crochet. I decided to make a kind of similar one, using Lalaloopsy colors, and just curls from the crown of the hat, since I already had the wig she was going to wear for trick or treating…and I decided to do this three days before Halloween. Anyway, the hat turned out almost exactly as I imagined!Hat-1-ChaosServedDaily

To begin, just make a basic hat.  I followed these simple instructions from Lion Brand Yarn, making it all one color rather than changing colors.  Then came the fun part…making the curls for it.

For each curl, I crocheted 25 chain stitches.  Then, into each chain, I crocheted 3 or 4 double crochet stitches.  It looks a little wonky as you’re doing it, but when you finish, it’s simple to twist the stitches into a spiral curl.  I left about a 6” tail at the start and finish.Hat-2-ChaosServedDaily

When I got all the curls made (I made all 7 in one evening), I just tied them securely to the crown of the hat, using the yarn tails. Princess Thundercloud loves it, and she can wear it anytime, since it’s not so crazy people would stare. Well, it’s a little crazy, but that’s pretty much how she dresses every day, anyway.  Confidently dresses, I should say. Hat-3-ChaosServedDaily

I saw an orange hat with a few curly green “vines” that one of my friends made for her baby girl…it was adorable, too!  My conclusion here is that adding a few curly-q’s is always good…they’re like the glitter of the yarn world!

Signature

Posted in knitting | Tagged , | 2 Comments

Merry, Munchable Snacks

Today I’m sharing a roundup of four of our favorite snacks…they’re delicious year-round, but at Christmas, they seem even tastier!  Scroll down to find recipes for Merry Munch Snack Mix, Gingered Party Mix, Chocolate & Sea Salt Popcorn, and Perfect Homemade Kettle Corn.  They’re all delicious for family movie nights or while driving around looking at lights, but they’re also perfect to box up as a gift. So here we go….

Merry Munch

Merry Munch Snack Mix

  • 1-1/2 cups powdered sugar
  • 8 cups rice Chex
  • 1 cup white chocolate chips
  • ½ cup peanut butter
  • 4 Tbsp butter, cut in cubes
  • ¼ tsp vanilla
  • 1-1/2 cups cashews or roasted pistachios
  • 1-1/3 cups dried cherries or cranberries

1. Place powdered sugar in a large ziptop bag. Measure cereal into large bowl.

2. In medium saucepan, melt butter, chocolate, and peanut butter until smooth. Stir in vanilla.

3. Pour over cereal and toss to coat.

4. Place half the coated cereal at a time into the powdered sugar, seal, and shake until evenly coated.

5. Repeat with remaining cereal.

6. Add nuts and dried cherries or cranberries, and enjoy!

Click here for the printable version

I’m so glad you can buy the standard party mix, as well as many other variations of it. Why?  Because I don’t like it, but always made it for my family and guests, of course!

Now I can make the party mixes I actually like, such as this version, spicy with ginger and sweet with banana chips and dried cranberries, as well as full of crunchy almonds and caramel-coated toasted cereal. Pure deliciousness, and perfect for movie night or on a hike…or, of course, at a party!

1212-Ginger-Cereal-Mix-(2)

Ginger-Honey Crunch

  • 6 cups Rice Chex® or Honey Nut Chex® cereal
  • 1 cup dried banana chips
  • 1 cup unblanched whole almonds
  • 1/4 cup butter or margarine
  • 1/4 cup packed brown sugar
  • 1/4 cup honey
  • 1 1/2 teaspoons ground ginger or cardamom
  • 1 cup flaked coconut (I was out of coconut, so this photo has none…but it adds a whole other layer of yumminess!)
  • 1/2 cup sweetened dried cranberries

1. In large microwavable bowl, mix cereal, banana chips and almonds.

2. In 2-cup microwavable measuring cup, microwave butter, brown sugar, honey and ginger uncovered on High about 2 minutes, stirring after 1 minute, until mixture is boiling; stir. Pour over cereal mixture, stirring until evenly coated. Microwave uncovered on High 4 minutes, stirring and scraping bowl every minute. Stir in coconut and cranberries; microwave uncovered on High about 3 minutes or until cereal just begins to brown.

3. Spread on waxed paper or foil to cool. Store in airtight container. Makes about 9 cups of mix.

Find the printable recipe at Chex.com

You know we are equal opportunity snackers here at Casa de Chaos, and love salty and sweet together.  Every Friday is movie night at our house, and, when I’m in a generous mood, the hooligans love this Chocolate and Sea Salt Popcorn Mix.
Popcorn-Mix-ChaosServedDail

Chocolate and Sea Salt Popcorn Mix

  • 8 cups freshly popped popcorn
  • 4 cups mini pretzel twists
  • ½ cup roasted, salted pistachios
  • ½ cup butter
  • 2/3 cup semisweet chocolate chips
  • 30 large marshmallows (not mini, not jumbo)
  • 1 teaspoon vanilla
  • 1 teaspoon flaked sea salt

1. Preheat oven to 275 degrees. Spray a large roasting pan or rimmed cookie sheet with cooking spray. In pan, combine popcorn, pretzels, and pistachios. Set aside.

2. In large heavy saucepan, combine butter and chocolate. Heat, stirring, over medium low heat until melted. Stir in marshmallows and continue heating and stirring until they are melted and smooth. Remove from heat and stir in vanilla.

3. Pour over popcorn mixture and toss gently to coat evenly. Spread evenly in pan and sprinkle with sea salt. Bake at 275 for about 20 minutes or until crisp, stirring halfway through.

Click here for the printable recipe

I made this last week, when we had rain and about 148 percent humidity.  It was crisp when I took it from the oven, but got a little soggy soon thereafter. I packaged my mom’s with a note to reheat it at 300 degrees for 10 minutes, and it crisped right back up, she said. Not to mention that when I re-crisped my portion, it tasted even better warm from the oven, while we watched a little Denver Bronco football.

When I’m ready for a quick collapse on the couch for movie night, we just whip up some Kettle Corn and call it good. It’s actually pretty amazing, though, not just good!

I am kicking myself for not figuring this out sooner.  As in, before we paid enough for kettle corn that we could have financed a college education. Making Homemade Kettle Corn is so easy…and inexpensive!  For less than a dollar, we make enough for the whole family (that’s two batches, by the way).

Popcorn-Title-ChaosServedDa

The key, in my opinion, is a old-fashioned stovetop popper, the kind with a tight lid and crank to stir the kernels while they’re popping.  We bought ours a few years ago, when we discovered that the built-in microwave in our house doesn’t properly pop popcorn. Crazy, right?  Anyway, we invested in a stovetop popper (one with a metal gear on the crank, not plastic that’s grey to look like metal in the photos online…ours was around $40), and have been happily popping away ever since.

Then, the morning of the 4th of July, we were headed to a parade and had no snacks to take. We decided to pop up some corn, and I suggested we throw a little sugar in with the butter and oil…voila, perfect Kettle Corn!

Popcorn-Popped-ChaosServedD

Here’s the simple how-to:

Homemade Kettle Corn

  • 1 Tbsp coconut oil
  • 2 Tbsp butter
  • 1/3 cup white sugar
  • 1/2 cup popcorn kernels

1. Melt the butter and coconut oil in the popper over medium high heat.  Add the sugar and the popcorn and replace the lid. Crank and crank until the popping slows, about 3 minutes. Be careful not to burn it, since the sugar can make that easy to do!

2. Pour it into a bowl, salt it, and ENJOY!

See…I told you it was easy!  This has become our favorite snack, whether for movie night or to take along to a parade or hike.

There you have it…four tasty ways to snack your way through the holidays. I can pretty much guarantee that we will have enjoyed all of them well before December 25!  Hope you do, as well!


Posted in recipes | Tagged , , | 1 Comment

Santa’s Longjohns Candy Bag

I found this cute Santa’s Longjohns Candy Bag at a craft bazaar a long, long time ago…probably at least ten years ago, before I had kids and could freely wander through the booths without a care in the world. I’ve copied it many times, however, in the years since, and I decided it was finally time to write up a pattern and share it!  I don’t think it’s copyrighted already, and I apologize if it is…just send me a note if I’m infringing.

Anyway, here it is…Candy-Bag-Title-ChaosServed

Sorry the photos are not the best…it’s been gloomy, gloomy here and it’s hard to get great shots! And it was a little snowy and pine needles were everywhere!

Santas-Longjohns-Bag-Patter

Click here for the downloadable pattern

This is so simple if you have basic sewing skills. And a sewing machine.   First, for the felt…you can make 15 from one yard of 45” wide felt, so much cheaper than buying those little squares of thinner felt.   Here’s what you’ll need:

  • Red felt
  • 5 small white buttons per bag you’re making…2 on back, 3 on front
  • 9” green ribbon for the bow at the neck
  • 1” square scraps of Christmas fabric for the patch on the front
  • Rhyme printed out and cut with decorative scissors
  • Fabric glue or hot glue for buttons, ribbon, and patches

The directions are printed on the pattern download, but here they are again.

1. Cut 2 of the bodies and one flap. Cut a 2” long slit in one body, where the flap would go.

2. Sew the flat side of the flap to the body with a slit in it, just above the slit. Candy-Bag-Back-ChaosServedD

3. Put the two bodies together, with the flap on the outside, and sew all around the edges.

4. Glue 2 buttons on the flap and 3 buttons and a ribbon bow on the front at the neck.  Glue the small fabric piece, like a patch, on the front.  Also glue the paper with the rhyme on it to the front. Candy-Bag-Front-ChaosServed

5. Stuff some treats inside!

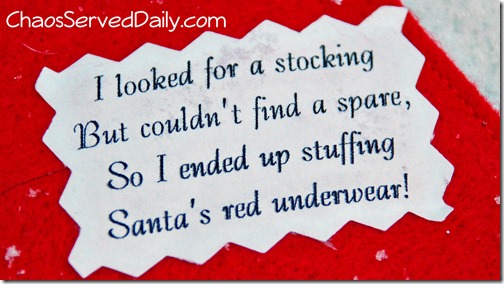
Here’s the rhyme for the tag:

I looked for a stocking,

But couldn’t find a spare,

So I ended up stuffing

Santa’s red underwear!Candy-Bag-Sign-ChaosServedD

Trust me, the little ones in your life (and some big ones, too!) will get a kick out of these!

Signature

Posted in Christmas, crafts | Tagged , | Leave a comment

Advent Activity Calendar…Again!

I know, I’ve posted this before…a couple of times! I think it’s such a great idea, instead of candy every day during Advent, since, Heaven knows, my kids get plenty of sugary treats during the Advent season.  They truly seem to love getting to do an activity each day, rather than a trinket or candy, anyway. Seriously. They’re weird.
Advent-Calendar

Anyway, on with the directions, so you can make one for yourself!  To make it, I simply resized and printed out the Days of December page template from Stampin’ Up, then resized and printed Ali Edwards Advent Boxes from DesignerDigitals.com.  I believe that Days of December is no longer available, but here’s a great alternative from Makoodle.

activity-cards

Anyhoo, I printed, cut, and then wrote out our list.  If you would rather, you can even type the list right on the cards before you print them.  I thought it was a nice touch to have my own handwriting on them, though.   After I wrote the activities, I figured out what would work on which day of the countdown and glued the backs together.  To make it a bit more finished, I rounded the corners of each card.

Then all that was left was to spice up the $4 frame I found at Walmart. This craft allowed me to use both a staple gun to attach the bakers’ twine and a hot glue gun for the burlap background.  All that was left to do then was hanging each card with cute little decorated clothespins. I made these glittery ones myself, but I just came from Target, where they had red mini-clothespins in a pack of 20 for $1. What a deal!  Oh, and I looped a wide striped ribbon around the frame to hand the whole shebang.

Voila! The hooligans will have such a great time with this!

Here’s our list, compiled from extensive research (I Googled “activity Advent calendars”):

1. Read the Elf on the Shelf book in preparation for his arrival

2. Clean out and organize toys and donate

3. Buy a toy and donate it to Toys for Tots

4. Make thumbprint tree ornaments from salt dough

5. Write letters to Santa

6.Celebrate St. Nicholas Day

7. Have a family game night

8. Make pinecone birdseed ornaments for outside tree

9. Make paper snowflakes and hang them EVERYWHERE!

10. Watch a Christmas movie

11. Do something kind and helpful for a family member

12. Focus on being kind and polite to everyone you meet

13. Read some Christmas books

14. Draw a Christmas picture

15. Make snow ice cream (hopefully!), or ice cream sundaes

16.Make cinnamon ornaments to tie on granola for neighbors

17. Decorate a gingerbread house

18. Bake and decorate cookies

19. Write Christmas notes to your teachers

20. Make ice candles

21. Drive around to look at lights and drink hot chocolate

22. Decorate birthday cupcakes for Jesus

23. Make a Christmas craft

24. Make popcorn and watch “The Polar Express” movie

Of course, your family’s list will be different…we’re certainly not the poster family for Advent activities!  I’m sure you find that hard to believe…not.

Now I have to go hide this until December 1, or the hooligans will be begging to start!

Signature

Posted in Christmas, kids | Tagged , | Leave a comment

Kid-Made Acorn Sugar Cookies

Just in case you’re looking for another dessert to add to the meal on Thanksgiving, here are some super cute cookies my hooligans made Sunday afternoon.  The did the cookie making, I made the icing, then they iced them…so I think that counts as made by them!

Cookies-ChaosServedDaily

I found the acorn cookie cutter at World Market, and they used our favorite Best Butter Cookie recipe from Land o’Lakes. Of course it’s our favorite…it’s like 50% butter!

For the frosting, I made pretty thin royal icing…2 Tbsp meringue powder, 1/4 cup water, 2 cups powdered sugar.  They dipped the front of the cookie for the light tan base coat (see how here), then dripped the darker brown icing and swirled it around with toothpicks, like we’ve made Halloween and Fourth of July cookies before.  I love this method of decorating cookies for kids because 1) it looks really pretty and polished and is very forgiving and 2) it’s a thin layer of frosting, just the right proportion of cookie to icing. We used Americolor gel colors….for the tan, I used 1 drop of yellow and 1 drop of brown.

Princess Thundercloud’s teacher has a birthday on Thanksgiving, so we’re going to take a few of these to her on Wednesday as a little pre-birthday treat. I hope she likes them as much as we do!

Signature

Posted in Fall, recipes | 1 Comment

Stampin’ Up! Online Extravaganza

It’s that time again…Stampin’ Up! is having their Online Extravaganza, starting Monday November 24 and running until Tuesday. December 2.  BUT….there are some really good deals that are only available Monday, November 24, and Monday, December 1…and ONLY WHILE SUPPLIES LAST! I think the Card Kit Bundle is a fantastic buy…you get both the Everyday Occasions Cardmaking Kit and the Hip Hip Hooray Cardmaking Kit for less than $35.  That’s the supplies and stamps to make 40 creative cards!

Here is a list of all the deals, but you can see them more easily at my Stampin’ Up! website…and you can place your order right then and there!  Happy Shopping!

image

image

image

Posted in Uncategorized | 2 Comments

Homemade Kahlua and Irish Cream

Yep, I’m cheap. I mean, thrifty.  Whatever…I hate spending tons of money on big bottles of liqueurs when I can make them at home. Not to mention that they make great gifts…a little handmade gift to spice up your coffee…what’s better than that?

Kahlua-ChaosServedDaily

This is really easy, y’all…here are the recipes for both.  The Kahlua does need to sit for 2 to 3 weeks, but you have plenty of time before Christmas.

Homemade Kahlua

  • ½ cup brown sugar
  • ½ cup white sugar
  • 2/3 cup water
  • 1 Tbsp espresso powder (or 3 Tbsp instant coffee)
  • 1 whole vanilla bean
  • 1 teaspoon vanilla extract
  • 2 cups good-quality vodka

1. Combine the sugars and water in a small saucepan and heat until sugar dissolves. Stir in espresso powder. Remove from heat and let cool.

2. Pour into a quart size jar. Add the vodka, vanilla, and vanilla bean.

3. Refrigerate for two to three weeks, until flavor develops.

Homemade Irish Cream

  • 1 can (12 oz) sweetened condensed milk (NOT evaporated milk)
  • 1 cup Irish whiskey
  • 2 teaspoons dark cocoa
  • 1 teaspoon vanilla
  • 1 teaspoon instant coffee
  • 1 cup heavy cream

1. Combine all in a quart jar and shake until well mixed.

2. Store in refrigerator and shake well before serving.

Click here for the printable recipe.

Give a little bottle of each, along with a bag of coffee, for a perfect neighbor or hostess gift!  I did write directions to refrigerate on the backs of the tags, just to be safe. I think these are a perfect thing to keep on hand for the holidays, in case friends drop by…a fresh pot of coffee and the addition of one of these, and you’re the hostess with the mostest!

Signature

Posted in gifts, recipes | Tagged , | 5 Comments